TradingView webhook alerts that actually fire every time
On this page
The hidden complexity behind one URL field
Most broken webhook setups look perfect on the day they’re built. You paste a URL into TradingView, fire a test alert, see a green confirmation, and move on.
Three weeks later, a clean breakout that should have opened a position never reached your broker.
The alert log says it fired.
The bot log says nothing arrived.
Or worse, it arrived twice.
That gap between “the alert triggered” and “the trade happened correctly” is where most automated traders lose money, and almost none of it is visible from the TradingView interface.
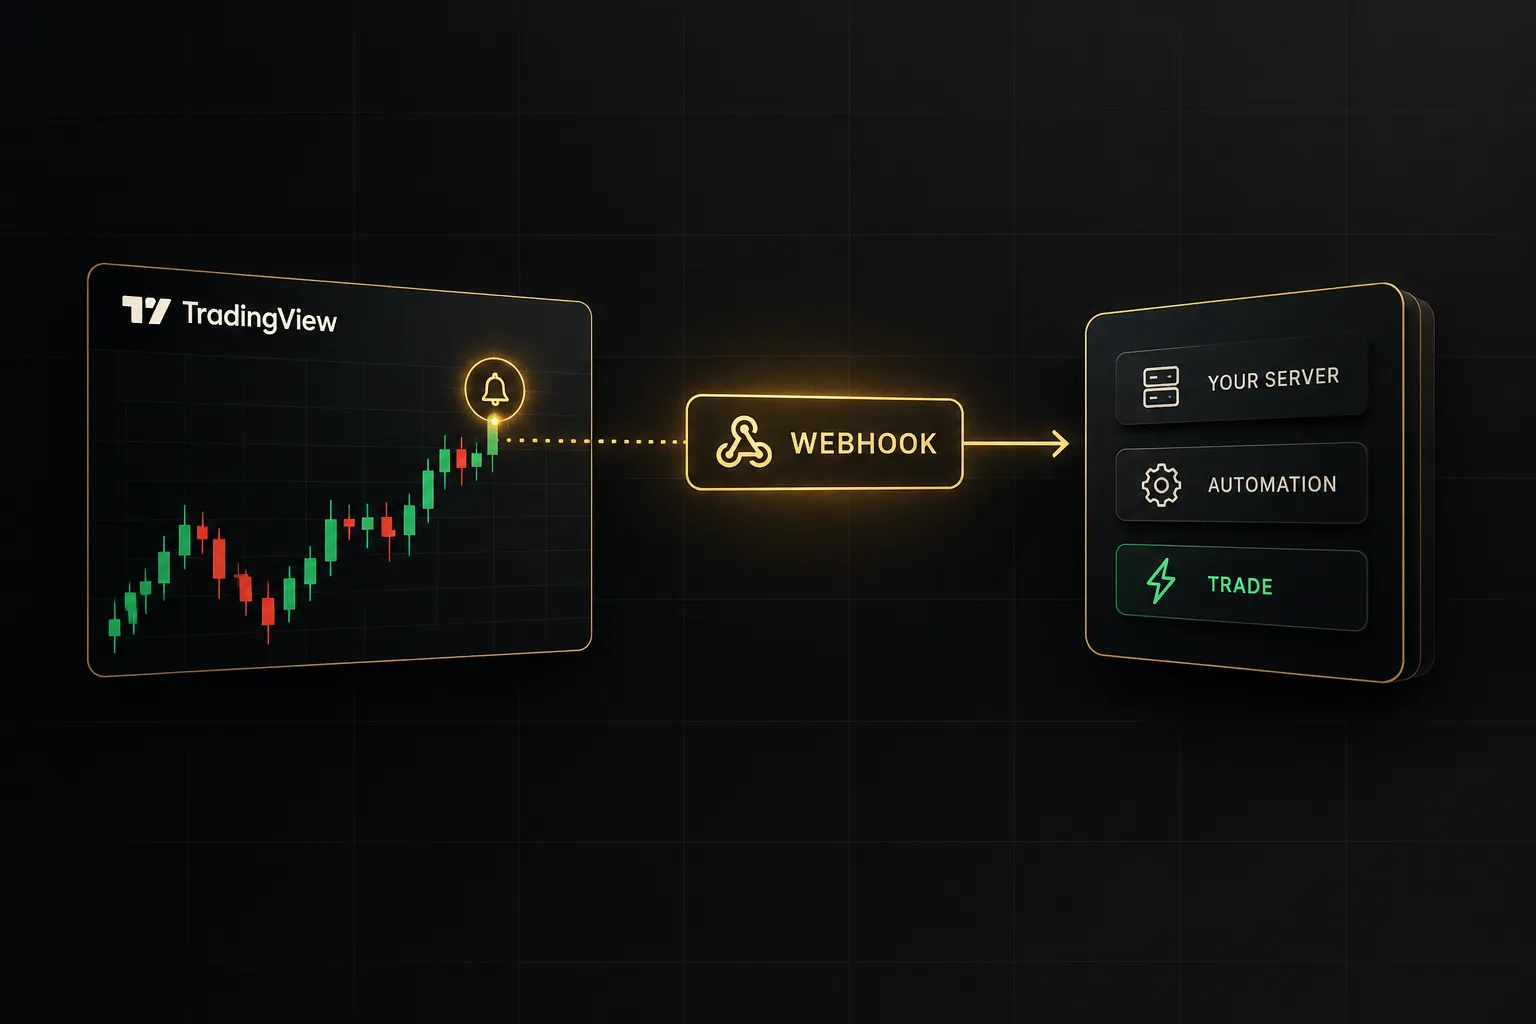
TradingView webhook alerts look like a single text field. In reality, they sit on top of a full request pipeline: a Pine Script condition, a saved alert snapshot, an HTTP POST request, a receiving server with its own rules, and whatever execution logic runs after that.
Each layer can fail quietly.
This guide walks through the entire request lifecycle, from chart trigger to receiver acknowledgment. You’ll learn how to build a valid JSON payload, why your endpoint has roughly three seconds to respond, how to block duplicate orders, and why a delivered signal is not the same thing as an executed trade.
It’s written for three kinds of readers:
Pine Script beginners setting up their first automated alert.
Systematic traders who already run strategies but keep hitting unexplained misses.
And developers connecting charts to bots, brokers, Telegram channels, or custom dashboards who want to understand exactly what TradingView sends and when.
How a webhook alert actually travels
Here’s what surprises most traders: your browser has nothing to do with it. Once an alert is saved, TradingView’s servers evaluate it, which is why alerts keep firing with your laptop closed.
Understanding that server-side journey is the first step to debugging anything.
From chart trigger to receiver acknowledgment
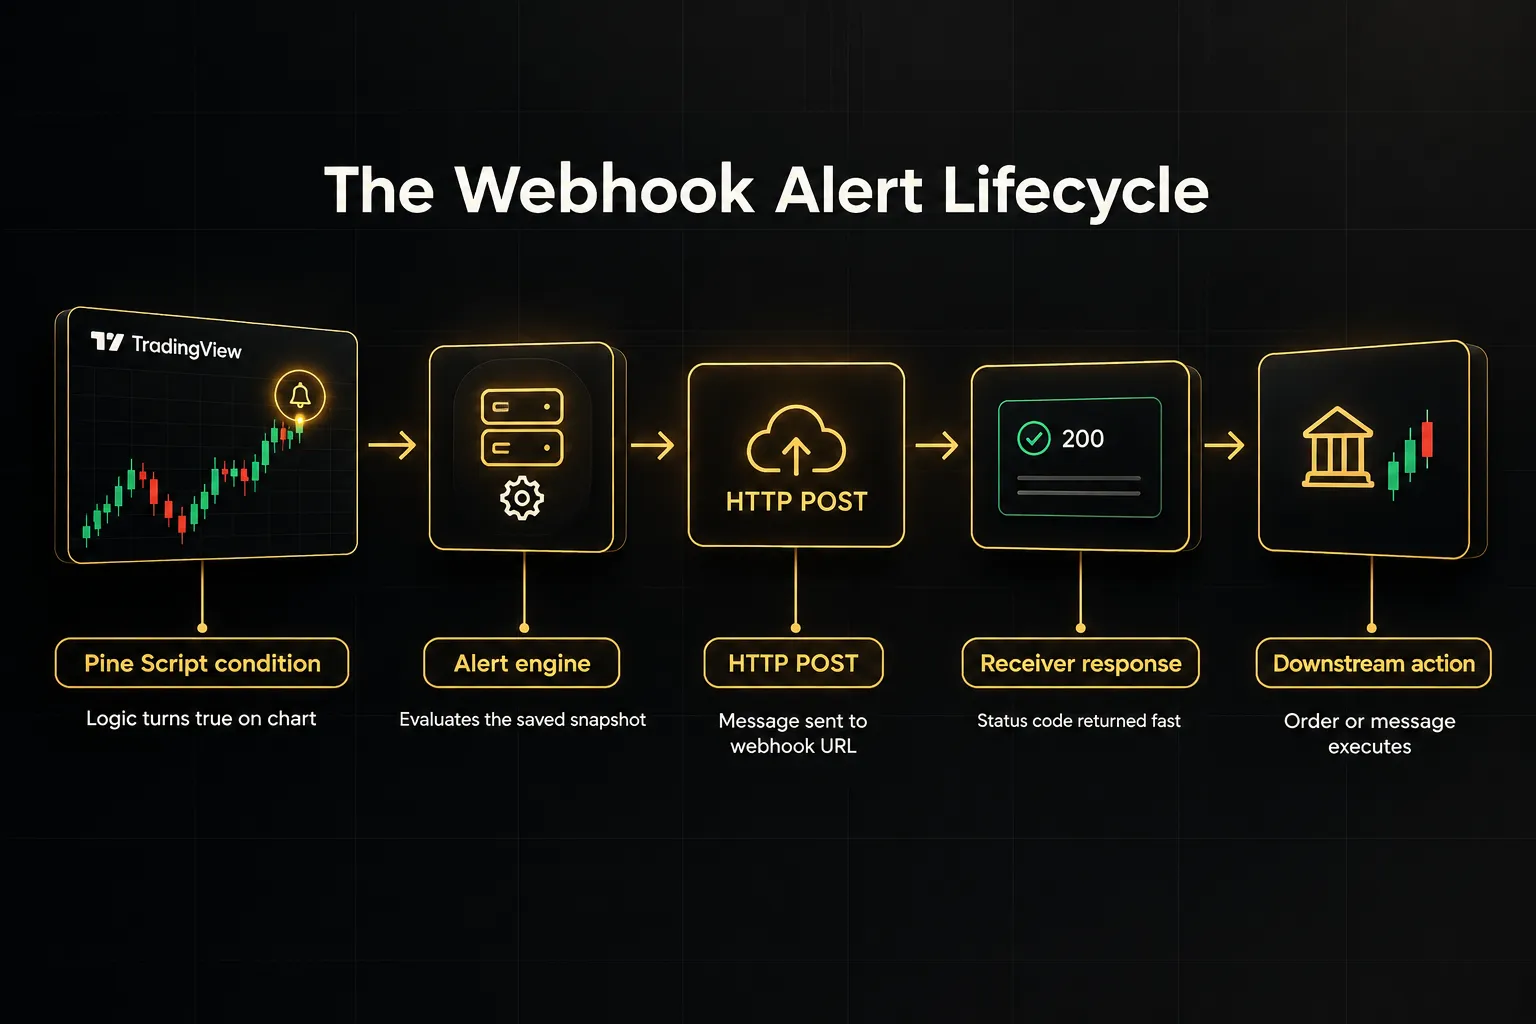
Every webhook alert passes through five distinct stages.
First, a Pine Script condition becomes true, such as a moving average cross or a strategy order fill. Second, TradingView’s alert engine evaluates that condition against the saved snapshot of your script, not the version currently on your chart.
Third, TradingView sends an HTTP POST request to your webhook URL, carrying the message you wrote as the request body. According to TradingView’s documentation, only ports 80 and 443 are accepted, so your webhook endpoint should be a standard HTTPS endpoint on port 443.
Fourth, the receiver returns a status code.
A 200 OK means the request arrived and the server accepted it. Fifth, and completely separately, the receiver runs its own downstream logic: placing an order, posting a message, writing a row to a spreadsheet.
That last split matters more than anything else in this guide.
A 200 OK response confirms delivery. It does not confirm that a trade was placed, validated, sized correctly, or filled.
Many bots return 200 the instant a request lands, then fail later because of insufficient margin, a symbol mismatch, or a closed market. TradingView never learns about those failures.
Your alert log will show success while your account shows nothing.
Why your JSON schema isn’t universal
TradingView doesn’t care what’s in your message.
It sends whatever text you write, with placeholders filled in. The structure of that text (field names, required keys, nesting, data types) is defined entirely by the system receiving it.
That’s why copying a JSON example from a forum post so often fails. One bot might expect “action”: “buy”, another wants “side”: “long” plus a passphrase field, and a broker API might reject both because it requires a quantity key and an exact symbol format.
Same signal, three incompatible schemas.
Common receivers include dedicated trading bots that route orders to crypto exchanges or brokers, and webhook-to-Telegram or webhook-to-Discord relays that turn alerts into chat messages. Others are spreadsheet loggers that record every signal for later review, custom Node.js or Python servers built on frameworks like Express or FastAPI, and no-code automation tools such as Make or Zapier.
Each one publishes its own expected format.
Treat that documentation as the source of truth, and treat every online JSON template as a starting point you’ll need to adapt. If the receiver doesn’t document its schema, test with a request inspector before trusting it with money.
Building your first webhook alert
The setup takes about five minutes.
The mistakes made during those five minutes can take weeks to surface. Follow this sequence and you’ll avoid the most common ones.
- Load and configure your script. Add the indicator or strategy to your chart, then set the symbol, timeframe, and every input exactly as you want them in production. The alert will capture these values permanently.
- Open the Create Alert dialog. Click the alarm clock icon in the right toolbar, right-click the chart, or press Alt+A. Make sure the dialog is pointing at the correct chart and symbol.
- Choose the condition. Select your script from the Condition dropdown, then pick the specific alertcondition() entry, “Any alert() function call,” or the strategy order-fill alert option for strategies.
- Set the trigger type. Choose Once Per Bar Close for most automated setups. It fires only after the candle confirms, which removes most of the false entries caused by intrabar noise.
- Write the message. Enter the exact payload your receiver expects, using TradingView placeholders for dynamic values. Validate it as JSON before saving if your receiver expects JSON.
- Enable the webhook. Open the Notifications tab, tick Webhook URL, and paste the URL provided by your receiving service. Double-check for trailing spaces, which break more setups than you’d expect.
- Name, save, and verify. Give the alert a descriptive name that includes the symbol and timeframe, then save. Watch the alert log after the first trigger to confirm the message fired as intended.
alertcondition() vs alert() in Pine Script
Pine Script gives you two ways to define alerts, and picking the wrong one creates friction later.
The alertcondition() function is a lightweight declaration used in indicators. It registers a named condition that appears in the alert dialog, with a fixed message template that can include placeholders.
The alert() function is more flexible.
It works in both indicators and strategies, accepts a message string built at runtime (so you can include computed stop levels or position sizes), and lets you set frequency per call with arguments like alert.freq_once_per_bar_close. One alert in the dialog, set to “Any alert() function call,” captures every call in the script.
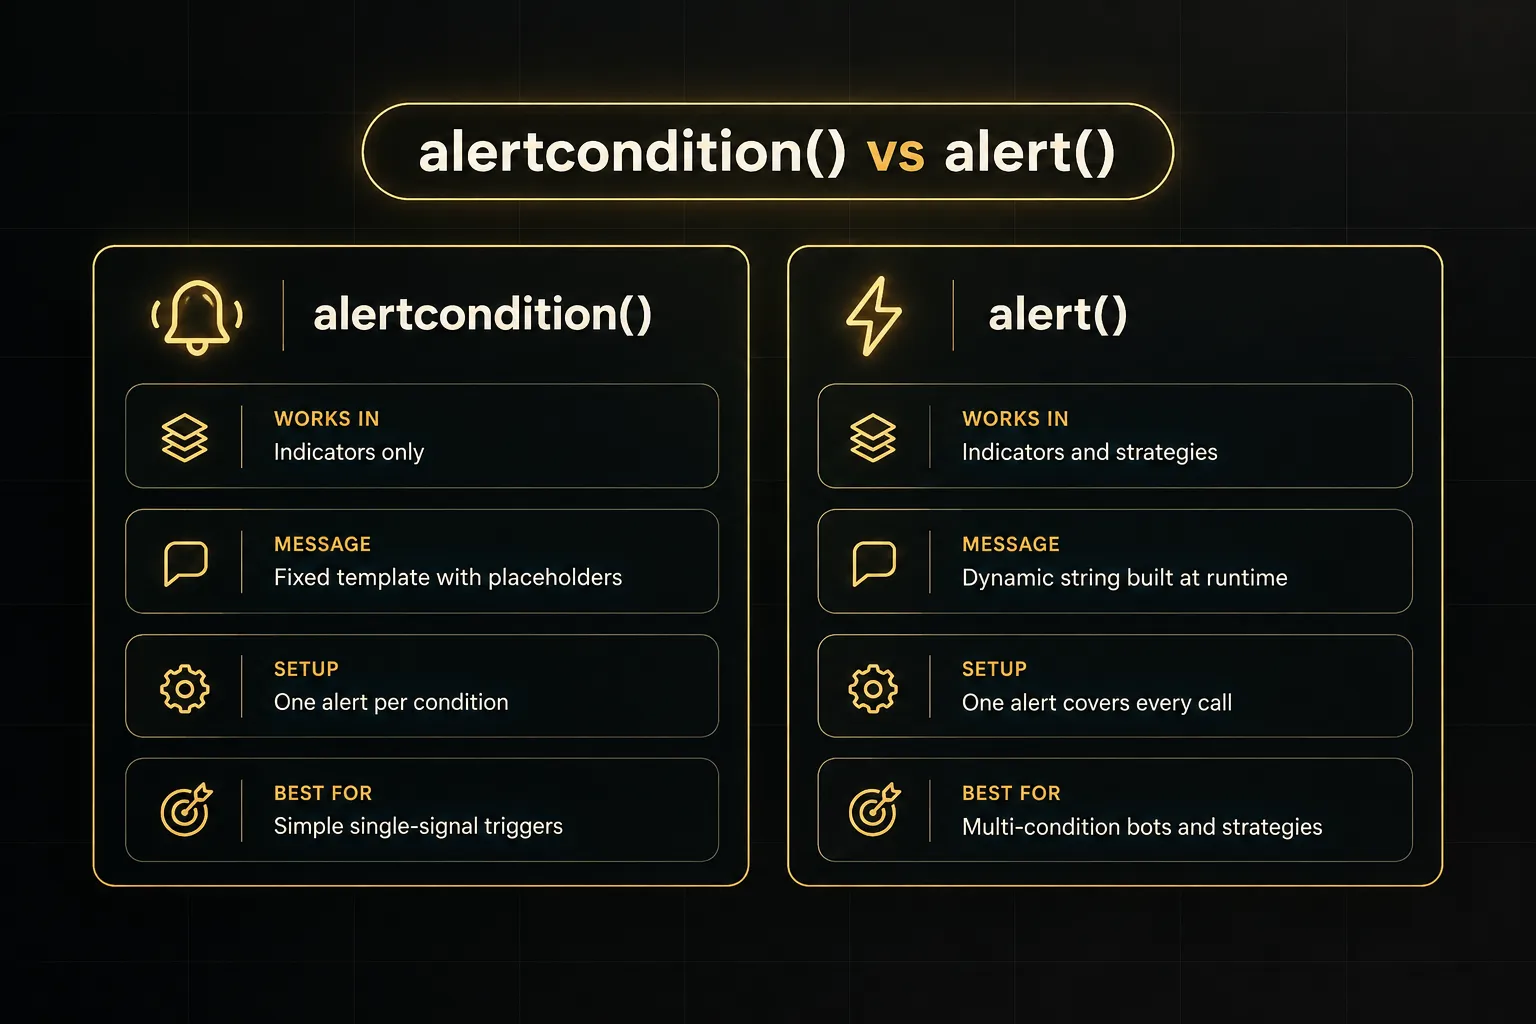
Use alertcondition() when you have one or two clean signals and want users to pick them from a dropdown.
Use alert() when your payload needs calculated values or your script has several entry and exit paths.
For strategies, the strategy order-fill alert combined with the alert_message parameter in strategy.entry() is often the cleanest option.
Placeholders and the alert snapshot trap
TradingView placeholders are tokens in double curly braces that get replaced with live values when the alert fires. The most useful ones for webhooks are:
- {{ticker}} returns the symbol, such as BTCUSDT or AAPL, without the exchange prefix.
- {{exchange}} returns the exchange name, which helps when the same ticker trades on multiple venues.
- {{close}} returns the closing price of the bar that triggered the alert.
- {{time}} returns the bar’s open time in UTC, while {{timenow}} returns the actual fire time.
- {{strategy.order.action}} returns “buy” or “sell” for strategy order fills.
- {{strategy.order.contracts}} returns the number of contracts or units in the filled order.
Now the trap.
When you save an alert, TradingView stores a frozen snapshot of the script version, inputs, symbol, and timeframe. Edit your indicator tomorrow, change a moving average length, publish a fix… and every existing alert keeps running the old version.
There’s no warning.
Your chart shows the new logic while your automation trades the old logic. The fix is simple but easy to forget: delete and recreate every alert after any script or input change.
Plain text vs valid JSON messages
TradingView decides the Content-Type header for you.
If the message field parses as valid JSON, it sends application/json. If it doesn’t, it sends text/plain, and many receivers reject that silently or return an unhelpful 400 or 415 error.
The usual culprits are small.
A trailing comma after the last field.
Curly “smart” quotes pasted from a document editor.
A text placeholder like {{ticker}} left unquoted.
Here’s a clean, valid example:
`{ "passphrase": "your-secret-here", "symbol": "{{ticker}}", "exchange": "{{exchange}}", "action": "{{strategy.order.action}}", "quantity": "{{strategy.order.contracts}}", "price": "{{close}}", "bar_time": "{{time}}" }`
Before saving, paste your message into any JSON validator with sample values swapped in for the placeholders.
Thirty seconds of checking prevents the single most common cause of failed webhook deliveries.
Making alerts reliable and secure
A webhook that works in testing can still fail under real conditions. Slow servers, duplicate requests, and leaked URLs are the three problems that show up most often once real money is involved.
The three-second response deadline
TradingView’s documentation states that if the remote server takes more than about three seconds to process the request, the request is canceled.
That three-second timeout is generous for a simple acknowledgment and brutally short for anything else.
The fix is architectural: acknowledge first, process later.
- Return 200 immediately. Your webhook receiver should validate the basic shape of the request, then respond before doing any slow work like broker API calls or database writes.
- Queue the real work. Push the payload into a job queue (Redis, Amazon SQS, or even a background thread for small setups) and let a separate worker handle order placement.
- Avoid cold starts. Serverless functions that sleep between calls can take several seconds to wake up, which alone can blow the deadline. Keep them warm or use an always-on server.
- Log the raw body first. Write the unparsed request to a log before any processing, so you always have a record of exactly what TradingView sent, even if later steps crash.
- Monitor response times. Track how long your endpoint takes to respond under load, and alert yourself if typical latency creeps above one second.
Duplicate signals and secret handling
Duplicate orders are more dangerous than missed ones.
A missed trade costs opportunity, while a doubled trade doubles your risk without warning. Duplicates can come from two alerts watching the same condition, a recreated alert left running beside the old one, network-level retries, or your own receiver retrying a failed job.
- Build an idempotency key. Combine stable values like {{ticker}}, {{time}}, and {{strategy.order.action}} into a unique ID, store it on receipt, and reject any later request carrying the same key.
- Check timestamps. Compare {{timenow}} against your server clock and discard signals older than a threshold you choose, such as 60 seconds, so delayed requests can’t trigger stale entries.
- Reconcile position state. Before opening a trade, query the broker for current positions. If you’re already long, a second long signal should be ignored or logged rather than executed.
- Keep secrets out of screenshots. Webhook URLs often contain tokens. Never share alert dialog screenshots publicly, and assume any URL posted online is compromised.
- Authenticate every request. TradingView doesn’t let you set custom headers, so put a passphrase in the JSON body and verify it server-side. If you need header-based request authentication downstream, add it in a relay you control.
- Rotate tokens and verify origin. Change secrets periodically, and allowlist the IP addresses TradingView publishes in its help center so requests from anywhere else are rejected.
A troubleshooting and testing checklist
When a webhook fails, guessing wastes hours.
Work through the failure points in order, starting with TradingView’s alert log, which shows exactly when each alert fired.
- The alert never triggers. The alert log is empty for the expected time. Check the condition logic, the snapshot (was the script edited after the alert was saved?), the symbol and timeframe, and whether the alert has expired or been paused.
- TradingView fails to send. The log shows a fire, but your receiver saw nothing. Check plan eligibility and two-factor authentication, URL typos, non-standard ports, IPv6-only hosting, and whether your server responded within three seconds.
- The receiver rejects the request. Your server logs show a 400, 401, or 415 error. Look for malformed JSON, a text/plain Content-Type header, wrong field names, or an incorrect passphrase.
- Automation fails silently downstream. The receiver returned 200, but no order appeared. Check symbol mapping (BTCUSDT vs BTC/USDT), minimum order sizes, available margin, market hours, and whether your queue worker is actually running.
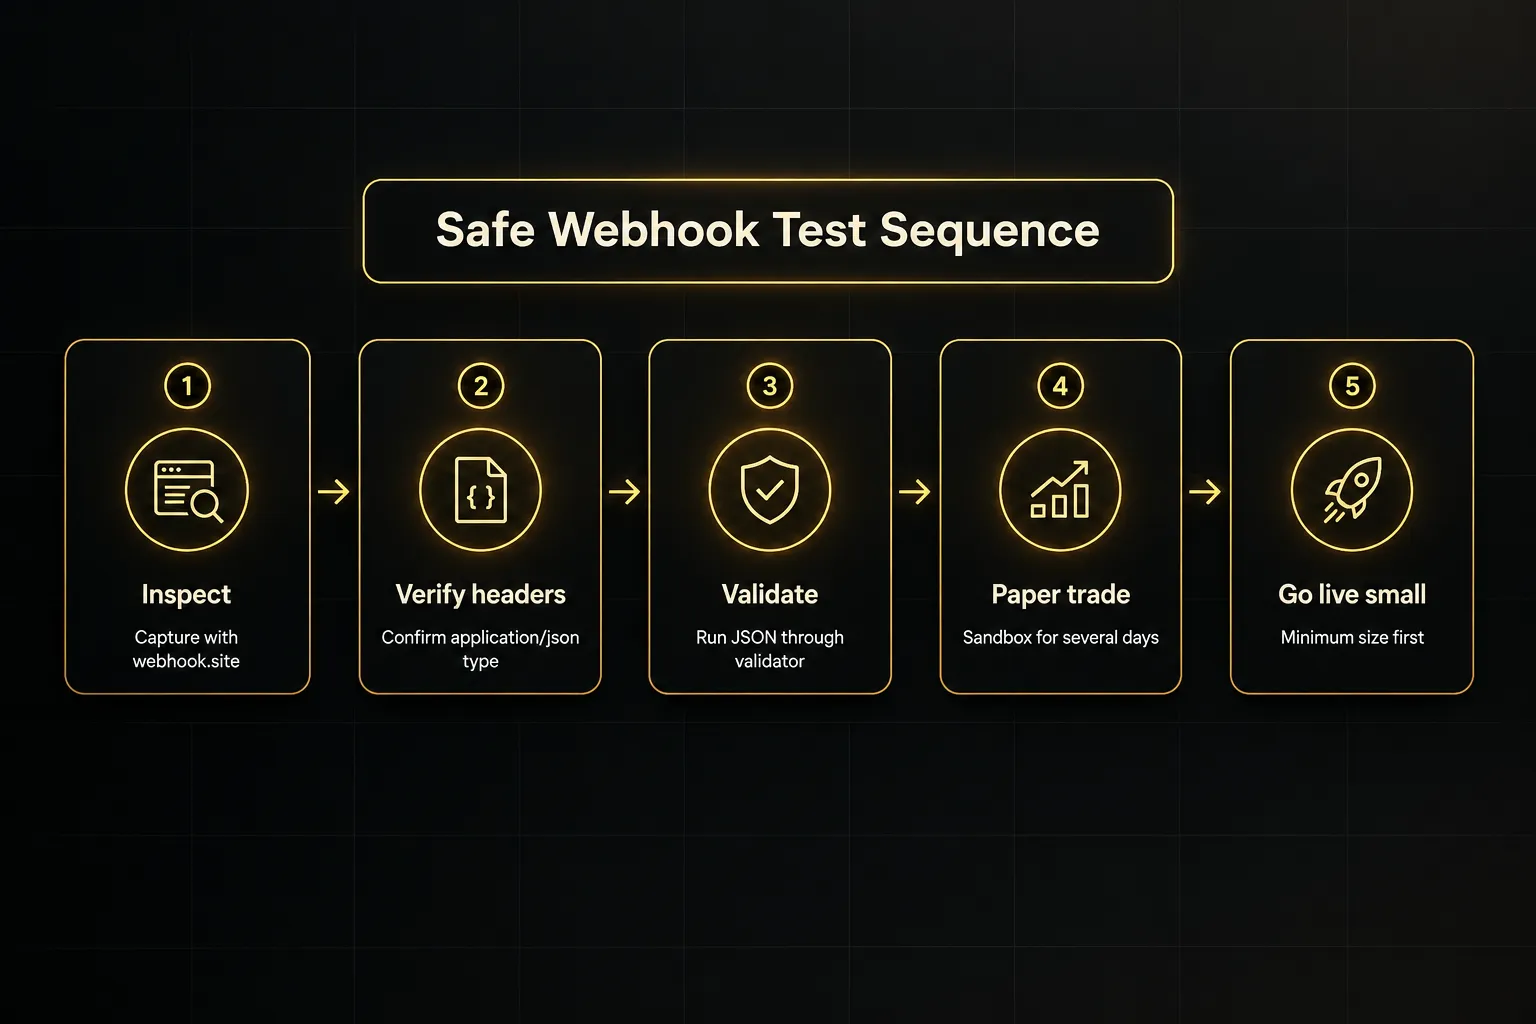
Before any alert touches a live account, run it through this safe test sequence:
- Point the alert at a request inspector. Use a temporary tool like webhook.site to capture the raw request without any real automation attached.
- Inspect headers and body. Confirm the Content-Type is application/json and every placeholder resolved to a real value.
- Validate the JSON. Paste the captured body into a JSON validator to catch structural errors your eyes missed.
- Route to paper trading. Switch the URL to a sandbox or paper trading account and let it run for at least several days of real signals.
- Go live small. Start with minimum position sizes and review every fill against the alert log before scaling up.
From signal to safe trade execution
Perfect plumbing can still deliver a bad decision at perfect speed.
Once your webhook fires reliably, the quality of what it carries becomes the whole game.
Candle close and non-repainting signals
Intrabar alerts are tempting because they fire faster.
But a price that crosses a moving average halfway through a candle can cross back before the candle closes. The signal appears, your bot enters, and then the condition that justified the entry vanishes from the chart.
That behavior is called repainting, and it’s the most common reason backtests look brilliant while live automation bleeds. Non-repainting signals rely on candle-close confirmation: the condition is evaluated only after the bar is final, so what you see historically matches what would have fired in real time.
Setting the trigger to Once Per Bar Close is the simplest way to get there.
You give up a few seconds or minutes of speed. In exchange, you remove a large share of false automated entries, and your live results start resembling your backtest.
Even a confirmed signal shouldn’t go straight to the broker, though. A minimal pre-trade gate checks five things before execution.
Entry confirmation verifies that the signal still holds on the latest data. Stop placement defines where the trade is wrong before it opens.
Position sizing calculates quantity from account risk, not a fixed number of contracts. A market condition filter blocks trades during illiquid sessions or major news. And a maximum daily risk cap stops all new entries once losses hit a preset limit.
That’s basic risk management, written in code instead of willpower.
Why PipTrend separates signal from entry
Most webhook payloads carry one piece of information: buy or sell.
That’s rarely enough to place a good trade.
PipTrend is a useful example of a different design, because its signal engine treats direction and entry as two separate questions.
Its directional signal confirms only on candle close, so the alert reflects a finalized bar rather than intrabar noise.
The precision entry comes from a separate layer of context: session highs and lows, VWAP, and supply and demand zones. A bullish signal tells you which side to favor, while those levels tell you where a trade actually makes sense.
That separation should shape your payload.
Instead of sending a bare “action”: “buy,” a better webhook message carries the direction plus the relevant entry level, the stop reference, and the timeframe. Your receiver can then decide whether to place a limit order at the zone, wait for price to reach it, or skip the trade entirely.
PipTrend’s real-time alerts can route to push notifications, email, or desktop alerts for traders who want to review each setup manually. Traders building automated or semi-automated systems can feed the same alerts into a webhook pipeline instead.
Many start with manual review, then automate only after the signals have proven themselves over dozens of trades.
Frequently asked questions
How do I use webhook alerts on TradingView?
You use webhook alerts by creating an alert, ticking Webhook URL in the Notifications tab, and pasting the URL from your receiving service. Write a message your receiver understands, set the trigger to Once Per Bar Close, and save.
Then confirm delivery with a request inspector before connecting real automation.
How do I create a webhook URL for TradingView?
The webhook URL is generated by the receiving service, not by TradingView itself.
Your trading bot, automation platform like Make or Zapier, or custom server provides the URL. For testing, a free request inspector like webhook.site generates a temporary URL instantly.
What is the webhook message format for TradingView?
TradingView accepts either plain text or JSON in the message field, and the structure depends entirely on what your receiver expects. If the message is valid JSON, TradingView sends it with an application/json Content-Type header.
Otherwise it’s sent as text/plain, which many bots reject.
Why is my TradingView webhook not working?
Most webhook failures come from one of four causes: the alert never triggered, TradingView couldn’t deliver it, the receiver rejected it, or downstream automation failed after a 200 OK. Start with the alert log, then check your server logs.
The troubleshooting checklist above walks through each case in order.
Can TradingView send alerts to a trading bot?
Yes, TradingView can send alerts to any trading bot that exposes a webhook endpoint on port 80 or 443. The bot defines the required payload format, so match its documentation exactly.
Add idempotency checks and a risk gate before letting it place live orders.
Do TradingView webhooks work on the free plan?
Webhook access depends on your TradingView plan, and historically it has been a paid feature.
Requirements can change, so check TradingView’s current plan comparison page as of 2026 to confirm eligibility. Also verify whether two-factor authentication must be enabled on your account before the webhook option becomes available.
The webhook is not the strategy
A webhook that fires every time proves one thing: messages reach their destination. It says nothing about whether those messages represent good trading decisions.
Plenty of traders have built flawless delivery pipelines that executed losing strategies with perfect reliability.
So here’s the decision summary.
If you’re still testing a system manually, route alerts to email, push notifications, or Telegram first, and review every signal by hand. If you’re automating orders, don’t go live until you have idempotency checks, a passphrase on every request, a pre-trade risk gate, and at least several days of paper trading behind you.
Then shift where you spend your energy.
Treat the webhook as plumbing.
It needs to be clean, secure, and boring.
The real edge lives upstream: in signal quality, candle-close confirmation, entry context, and the execution rules that decide what happens after the message arrives.
Get those right, and your TradingView webhook alerts become what they should be.
A quiet, dependable pipe carrying decisions worth executing.
Risk Disclaimer: Trading involves risk. Past performance doesn't guarantee future results. Only trade with money you can afford to lose. PipTrend is a tool to assist your trading decisions, not financial advice.